To waterproof basement walls in New Jersey, start by sealing internal foundation cracks with polyurethane injections and applying a high-quality exterior waterproof membrane.
North Jersey’s clay-heavy soils hold 40% to 80% of their volume in water, and they can remain saturated against foundation walls for days after a heavy rain.
This creates severe hydrostatic pressure that forces water through cracks and joints regardless of interior coatings, often requiring an internal waterproofing solution alongside extended downspouts and French drains.
While minor dampness can sometimes be temporarily masked with waterproof paint, failing to address the source of a basement leak can cause structural stress and necessitate expensive repairs.
In this guide, you’ll learn the exact step-by-step process for waterproofing basement walls, along with the best professional waterproofing methods for New Jersey’s climate.
When rain falls around your foundation, the surrounding soil absorbs moisture. As the soil becomes saturated, water begins pressing against the basement walls.
This pressure, known as hydrostatic pressure, is one of the leading causes of basement leaks throughout New Jersey.
Several regional factors make the problem worse:
Over time, water finds the path of least resistance and enters through small openings in the foundation.
Finding moisture buildup on walls, efflorescence (a white, chalky powder), or water stains on walls is the most common sign that your basement is not adequately waterproofed.
Unfortunately, many homeowners do not notice water intrusion until significant structural or cosmetic damage has already occurred. If you suspect a moisture issue, look for these key indicators.
Even if water is not actively entering the basement, these symptoms often indicate moisture intrusion is occurring behind the scenes.
Successfully mitigating water intrusion requires a systematic approach that addresses both external pressure and internal vulnerability; follow these six essential steps to properly waterproof your New Jersey basement walls:
Before repairs can be made, a professional will identify the source of the moisture intrusion. In New Jersey homes, water typically enters a basement through four primary vulnerability points:
Reducing the volume of water that actually reaches your foundation dramatically lowers the risk of basement leaks.
To optimize your property’s exterior drainage, implement these four essential landscaping and maintenance tactics:
Existing foundation cracks must be professionally repaired and sealed before any larger drainage or waterproofing systems are installed.
Depending on the nature of the fracture, technicians generally utilize one of two foundation crack repair methods:
Exterior waterproofing is widely considered the most reliable way to secure basement walls. Unlike interior drainage solutions that manage water after it enters your home, exterior barriers prevent groundwater from ever contacting the structure.
A comprehensive exterior waterproofing installation involves four distinct phases:
While exterior systems are highly effective, full perimeter excavation is not always feasible for every property. In tightly developed New Jersey neighborhoods, exterior digging is frequently obstructed by tight property lines, existing patios, concrete driveways, mature landscaping, or underground utility lines. In these restrictive situations, a professionally engineered interior waterproofing system provides a reliable, non-invasive solution to manage groundwater.
An interior drainage channel is a specialized piping system installed beneath the concrete slab along the lower perimeter of the basement floor.
Instead of fighting hydrostatic pressure outside, this system proactively intercepts water as it enters through wall cracks.
Once captured, the channel safely redirects the rising groundwater away from your living space and carries it directly into a central collection basin.
Collected drainage water flows directly into a heavy-duty sump basin, where a primary pump automatically discharges the water out of the house and onto a sloped area far from your foundation.
High-quality professional installations feature cast-iron pumps for long-term durability, alongside a comprehensive backup system that includes secondary pumps, battery backups, and high-water alarms to keep your basement dry during sudden power outages or severe storms.
To supplement sub-floor drainage, technicians attach durable interior vapor barriers directly to the exposed foundation walls.
Concrete and masonry blocks naturally wick moisture out of the damp earth, which can elevate indoor humidity levels even without active flooding.
These heavy-duty sheet barriers stop moisture migration in its tracks, sealing out vapor and preventing mold growth.
If severe hydrostatic pressure has already caused your foundation walls to move, you may need structural repairs to ensure safety.
Wall anchors can be installed to stabilize walls that are bowing inward, gradually pulling them back into position while preventing future shifting.
For minor bowing, horizontal cracks, or reinforced block walls, carbon fiber straps offer a low-profile way to strengthen the foundation without major excavation.
More severe structural failures may require heavy-duty steel bracing systems designed to permanently secure the masonry.
A qualified foundation specialist can inspect the damage to determine exactly which structural repair solution is appropriate for your home.
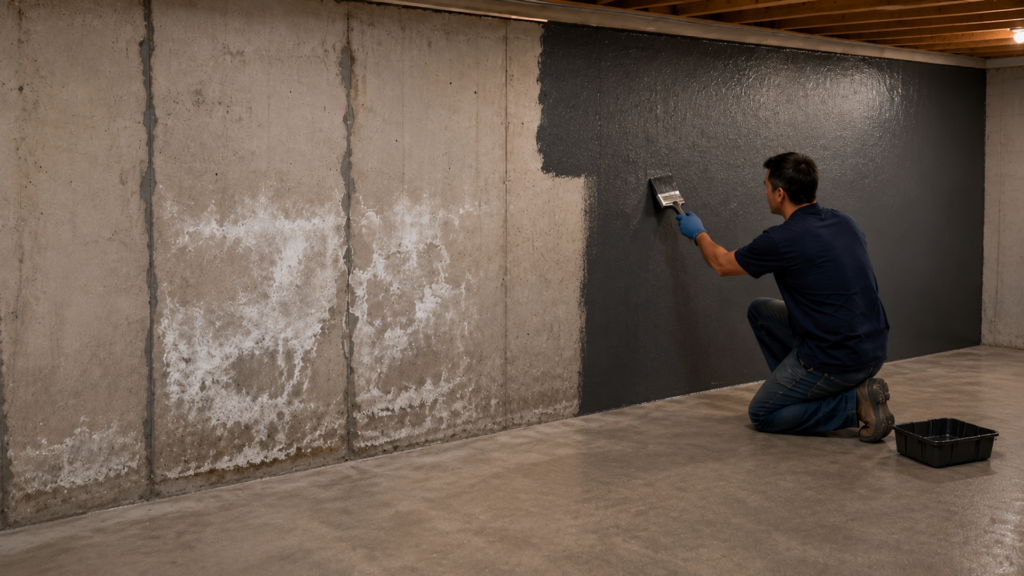
Waterproof paint cannot permanently stop active basement leaks. While many New Jersey homeowners consider waterproof coatings a budget-friendly fix, these products only mask the symptoms without addressing the root cause of water intrusion.
Over time, rising groundwater creates immense lateral hydrostatic pressure against your foundation. This continuous force eventually causes waterproof paint to bubble, blister, peel, and fail entirely.
Properly waterproofing basement walls in New Jersey requires moving past temporary cosmetic fixes and implementing a strategic combination of exterior drainage management and professional interior waterproofing to permanently protect your home from severe hydrostatic pressure.
The cost to waterproof basement walls in New Jersey typically ranges from $2,500 to $10,000+, with an average of $ 5,200. Minor interior crack sealing and vapor barrier installations sit on the lower end ($2,200 – $8,200), while comprehensive sub-floor interior drainage systems or full exterior perimeter excavation can cost between $1,500 and $6,300+, depending on the size of the foundation.
Standard New Jersey homeowners' insurance policies do not cover the cost of basement waterproofing or damage caused by rising groundwater and hydrostatic pressure. Insurance typically covers only sudden, accidental bursts in interior plumbing. To protect against rising water tables or flash flooding common in NJ, homeowners must purchase a separate flood insurance policy through the National Flood Insurance Program (NFIP).
Yes, you can effectively waterproof your basement from the inside using a sub-floor interior drainage channel paired with a heavy-duty sump pump. While interior systems do not stop water from entering the foundation blocks, they safely intercept the moisture at the cove joint and pump it away before it can flood your living space.
Sudden basement leaks after heavy rain are caused by hydrostatic pressure built up in New Jersey's clay-heavy soils. Clay expands dramatically as it absorbs water, holding thousands of gallons of stormwater tightly against your foundation. When the pressure becomes too intense, the trapped water is forcefully driven through hairline cracks, porous masonry block cores, and the floor-wall seam.
A professionally installed interior or exterior basement waterproofing system can last for the lifetime of the structure. High-quality components, such as rubberized exterior membranes, dimpled drainage boards, and perforated French drains, are designed to endure indefinitely, though mechanical components like sump pumps typically require replacement or maintenance every 7 to 10 years.